Photography On iPhone: How To Take Better Travel Photos With Your iPhone
/This post contains affiliate link, meaning that I earn a commission on each sale at no extra costs for you. The commission received helps to support this website and keep it ad free. ;)
The iPhone is an amazing camera. It takes some of the best photos that you can get out of any smartphone.
But, as good as the iPhone’s camera is, there are a lot of things that you can do to make your photos even better than just using the camera’s default settings.
Here are 12 photography tips for iPhone that will quickly improve your photos.
Editing iPhone photos using Lightroom
First up: editing! After taking your photo, don’t just leave it as it is — give it some extra love using an app like Lightroom CC for mobile or desktop. In my experience, editing your phone photos can make a big difference when it comes to adding interest and depth to your images.
You can download Adobe Lightroom Classic CC for free here (paid subscription required)
Lightroom is a great app for editing your images. You can adjust many settings to make your photos look unique. You can even create presets to edit your photos in one click.
Learn more about Adobe Lightroom with my past articles below:
Lightroom Mobile: My Complete Workflow To Edit My Photos On The Go
How To Use Lightroom Mobile To Edit Your Photos In One Click
Edit Your Instagram Photos Like A Pro Using Lightroom Presets
You can also have a look at my Travel presets pack for inspiration.
Look for leading lines
Leading lines help draw your eye into a photo and make it more interesting. By framing your subject with leading lines, such as a wall or fence, you can give a sense of depth to your image.
Capture close-up details
A small detail might not seem like much on its own, but close-up shots can be really interesting when you isolate a certain subject from its surroundings. Try taking pictures of grounds, hands, feet or flowers - anything that'll give your photo some texture and colour can work well.
Getting closer to your subject will give your image more impact and make whatever you're photographing stand out more in the frame. When you're photographing people, getting closer also allows you to capture more detail in their face and emotions which leads to stronger portraits.
Show depth in your photos
In a landscape or street photo, show that there's more than one plane of interest by adding something in the foreground. This draws the viewer's eye into the photo and creates a sense of depth. The same is true for portraits. If you can't move back far enough because of space constraints, then get up close and fill the viewfinder with your subject's face.
Shoot From A Low Angle
Shooting from a lower angle will give your photo a more dramatic effect by making your subject appear larger than it actually is. This low angle is especially great for shooting landscapes, flowers, and other objects that you can easily get close to.
Keep your photos simple
When you're out taking photos, don't get caught up in trying to capture everything around you — focus on one element and capture it well. A simple photo of a flower in the sun or a person walking down the street can be just as powerful as an image with tons of elements going on in it.
Use the rule of thirds
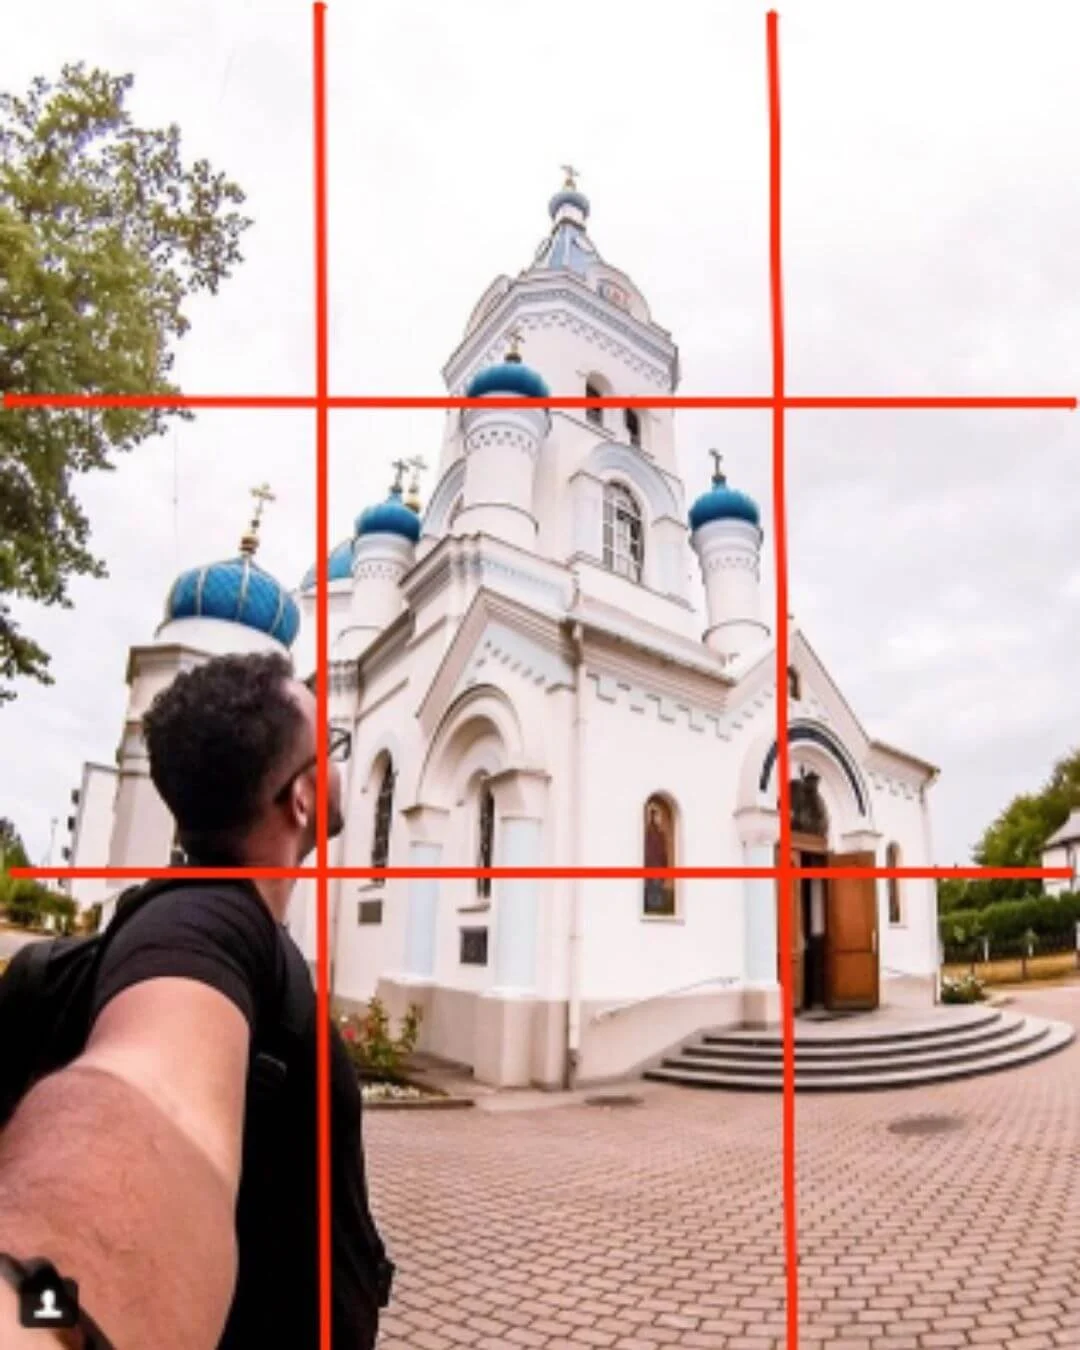
The rule of thirds is a basic photographer's guide to making more interesting pictures by simply avoiding putting your subject dead center in the frame.
To use it, imagine a grid made up of two vertical lines and two horizontal lines that divide your viewfinder into nine sections. Then put your subject at the intersection of one of those lines (or along one of those lines).
Turn on the grid for better composition
Having the grid on will help you with all sorts of other tips as well as help you with basic photography composition in general, so I recommend keeping this setting turned.
Go to settings > camera > activate grid.
Use symmetry
Using symmetry can make your photos a lot more appealing to look at and help make them more visually interesting. The best part about this tip is that it's incredibly easy to do. Just find something with symmetry (like a wall or building) and take a photo of it while standing directly across from it.
Use reflections
This is another easy tip that will make your photos look great with minimal effort. All you need to do is find something reflective, like a window or pond, find an interesting subject to put in front of it and take a photo of the reflection. The best part about this tip is that you can use it for almost any type of photography — portrait, landscape, etc.
Use the volume button to take sharper photos
When you use the shutter button in the Camera app, your finger can move ever so slightly when you tap it. This small movement will result in blurry photos. To get around this issue, consider using your earbuds' volume buttons instead. You can even use your headphones' volume buttons if they have them. Plug them in before you start taking pictures so that all you need to do is press a button when it's time to snap a photo.
Keep a clean lens for clearer photos
Keeping the lens on your iPhone clean will help you get clearer photos. Use a microfiber cloth or a lens cleaning kit to keep your lens free from dirt and fingerprints.
To recap, the best 12 ways to take better photos with your iPhone are:
Edit iPhone photos using Adobe Lightroom
Look for leading lines
Capture close up details
Show depth in your photos
Shoot from low angle
Keep your photos simple
Use the rule of thirds
Activate the grid on your phone for better composition
Use symmetry
Use reflections
Use the volume button to take sharper photos
Keep a clean lens for clearer photos
Smartphones have revolutionized photography, and the iPhone is leading the pack.
The camera in your pocket is so good that professional photographers are using it to get paid work. Have a look at the work of @karenxcheng for instance. It's versatile enough to be used for everything from a quick snapshot to a full-fledged portrait session. And thanks to Apple's Live Photos feature, you can even make short movies with your iPhone.
Taking great photos on an iPhone is pretty easy, but if you want to get really creative with your photography you need a little insider knowledge.
FREE Photography On iPhone Class: How To Take Great Photos with your iPhone?
No matter how hard you try, you just can’t seem to take good photos with your iPhone?
Did you know that there are simple 3 steps that you can use to improve your photography and make it look professionally taken?
I will show you step by step how you can take professional looking photos with your iPhone in under a minute.
If you enjoyed reading this article, make sure to like it, it actually makes a difference. And if you’d like to receive more photography updates, you can subscribe to my email list below and join thousands of photography enthusiasts like you.
PIN ME


